Microsoft Word is the most widely used word processing software, and users frequently encounter issues when trying to delete page in word. Whether you are working on a report, essay, or professional document, extra pages can disrupt formatting and printing. This guide will provide in-depth solutions to delete any page in Word across all platforms, including Windows, Mac, Word Online, and mobile applications. You will also learn troubleshooting techniques, advanced tips, and automation methods to handle complex documents efficiently.
Understanding Why Extra Pages Occur in Word
Before delete page in word, it is essential to understand why they appear. Word handles pages differently than physical print documents. Each page is not just a blank sheet; it contains formatting elements such as paragraph marks, section breaks, page breaks, and hidden characters. The most common reasons for extra pages include:
- Blank paragraph marks: Pressing Enter multiple times at the end of a document creates invisible paragraph markers that occupy a full page.
- Manual page breaks: Users may accidentally insert page breaks to adjust content.
- Section breaks: Different sections with varying headers, footers, or orientation can create new pages.
- Tables at the bottom of a page: Tables sometimes push a paragraph marker to a new page, creating a blank page afterward.
- Hidden formatting characters: These are often invisible and prevent proper deletion without showing formatting marks.
Understanding these causes allows you to choose the correct method to delete pages effectively.
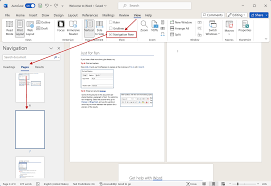
Method 1: Using Navigation Pane to delete page in word
The Navigation Pane is a built-in tool that lets you view the structure of your Word document. It is useful for quickly identifying unwanted pages.
- Go to the View tab and select Navigation Pane.
- Click the Pages tab to see a thumbnail view of all pages.
- Scroll through the thumbnails and select the page you want to delete.
- Press Delete on your keyboard.
This method works for both blank pages and pages with content. For complex documents, it helps identify where section breaks or hidden elements are causing extra pages.
Method 2: Selecting and Deleting Page Content Manually
Sometimes, manually selecting page content is the fastest way to remove a page.
- Place your cursor at the beginning of the page you want to remove.
- Hold the Shift key and click at the end of the page to select all content.
- Press Delete.
If a blank page persists, it is likely caused by paragraph markers or section breaks, which will require additional steps.
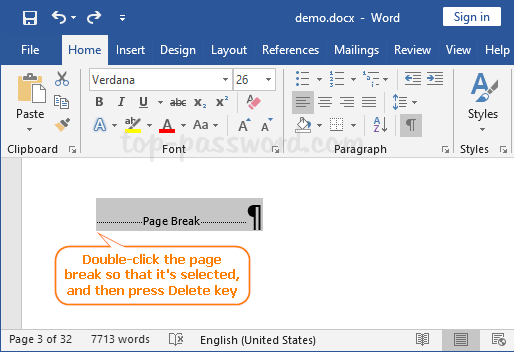
Method 3: Deleting Blank Pages at the End of a Document
Blank pages at the end of a Word document are common. They are usually caused by paragraph marks or tables.
- Enable Show/Hide Formatting Marks from the Home tab.
- Select the paragraph markers on the blank page.
- Press Delete.
If a section break is causing the page, follow these steps:
- Place the cursor before the section break.
- Press Delete to remove it.
- Adjust page formatting if necessary.
Method 4: Using Keyboard Shortcuts for Quick Deletion
Keyboard shortcuts save time when delete page in word.
- Ctrl+G (Windows) or Command+Option+G (Mac) opens the Go To dialog.
- Type \page and press Enter to select the entire page.
- Press Delete.
This method is particularly useful for long documents with multiple pages.
Method 5: Handling Section Breaks That Create Extra Pages
Section breaks are a common source of stubborn blank pages. Removing them requires understanding the document layout.
- Enable Show/Hide Formatting Marks.
- Locate the Next Page or Continuous Section Break causing the extra page.
- Place your cursor before the break and press Delete.
- Be cautious: deleting section breaks can alter headers, footers, or page numbering.
Method 6: Deleting Pages in Word Online
Word Online has limited functionality compared to the desktop version but still allows delete page in word.
- Select the content on the page.
- Press Delete or Backspace.
- For stubborn blank pages, adjust paragraph spacing or remove extra paragraph marks manually.
Method 7: Deleting Pages on Mac Word
Mac users follow similar steps but with slight differences in shortcuts.
- Use Command+Option+G to go to a specific page.
- Select page content and press Delete.
- To remove blank pages at the end, enable Show All Characters and delete extra paragraph marks.
Method 8: Using Find and Replace to Delete Blank Pages
Find and Replace can be used to target delete page in word breaks or paragraph markers.
- Open Find and Replace (Ctrl+H or Command+H).
- In the Find what box, type ^m for manual page breaks.
- Leave the Replace with box empty.
- Click Replace All.
This method quickly removes multiple page breaks across the document.
Method 9: Adjusting Table and Content Layout to Remove Pages
Tables can push content to a new delete page in word. Adjusting table size or paragraph spacing helps.
- Select the table at the end of the document.
- Reduce the table’s height or font size of the paragraph marker after the table.
- Ensure no extra paragraph markers remain after resizing.
Method 10: Advanced Techniques Using Paragraph Settings
Sometimes blank pages persist due to paragraph spacing.
- Select the paragraph on the blank page.
- Open Paragraph Settings from the Home tab.
- Set Spacing Before and Spacing After to 0 pt.
- Enable Line and Page Breaks and uncheck Page break before if selected.
This often removes stubborn blank pages caused by hidden formatting.
Method 11: Using VBA to Delete Pages Automatically
For advanced users, Visual Basic for Applications (VBA) can automate delete page in word.
- Press Alt+F11 to open the VBA editor.
- Insert a new module.
- Paste the VBA code that loops through pages and deletes blank or specific pages.
- Run the macro to automatically clean the document.
This is particularly useful for bulk document processing or reports generated from templates.
Method 12: Deleting Pages in Complex Documents with Multiple Sections
Complex documents with multiple sections and varied headers or footers require careful handling.
- Identify section breaks using Show/Hide Formatting Marks.
- Decide whether you need to preserve headers or footers.
- Delete unnecessary section breaks without disrupting content layout.
- Adjust page numbering and formatting if required.
Method 13: Printing and Pagination Considerations
delete page in word does not always reflect in printed documents if margins or hidden content exist.
- Use Print Preview to confirm page removal.
- Check for invisible elements such as text boxes, footnotes, or endnotes.
- Ensure page layout settings (margins, paper size) do not create extra pages.
Method 14: Troubleshooting Common Issues
- Page won’t delete after removing content: Check for manual page breaks or section breaks.
- Document shows a blank last page: Remove extra paragraph marks or adjust table sizes.
- Deleting section breaks affects headers/footers: Copy headers/footers before deletion and reapply them.
Method 15: Tips for Avoiding Extra Pages in Future Documents
Preventing extra delete page in word is easier than deleting them later.
- Use Ctrl+Enter for intentional page breaks instead of multiple Enters.
- Avoid unnecessary section breaks unless required for formatting.
- Regularly enable Show/Hide Formatting Marks to monitor hidden elements.
- Adjust paragraph spacing and table sizes during document creation.
Conclusion
delete page in word can be simple or complex depending on the document’s content and formatting. By understanding the reasons for extra pages, using the right tools like Navigation Pane, keyboard shortcuts, paragraph settings, and advanced VBA automation, users can efficiently manage their documents. Implementing preventive measures ensures future documents remain clean and professional.